Digging In: Excavating Archaeological Sites
Note – We are currently beta testing this textbook. If you are a student who has been assigned this reading, we would appreciate any feedback you may have. After finishing the chapter, please go to https://forms.gle/3QDm5QYi4ft4wbnXA to complete a short survey.
Jennifer M. Zovar, Ph.D., Whatcom Community College
Learning Objectives
- Describe the process of archaeological excavation
- Explain how different site formation processes affect excavation and interpretation
- Evaluate appropriate excavation strategies for different circumstances
- Explain the ethics of archaeological excavation and collection
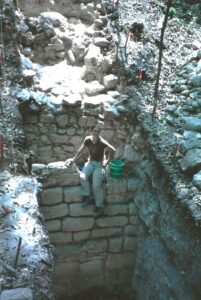
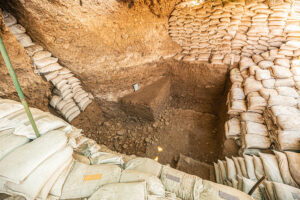
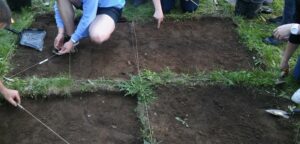
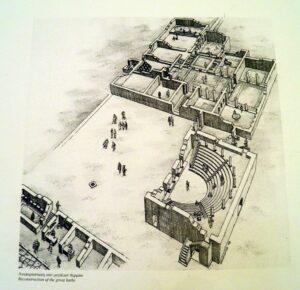
I love excavation. I love being outside and getting into the dirt. I love the potential that I might be the first person in 100, 500, or 1000 years to touch a specific object or uncover a feature that tells the story of past human activities. Even on days (or months!) where nothing much is ‘discovered,’ I like the meditative process of slowly scraping through the soil, watching for minute changes in color and texture that may indicate human activity. I enjoy the discipline of plotting a measured, methodical grid across a site and cutting clear, straight unit walls that show the layers of human activity and other natural processes. I like how archaeological excavation unites physical activity with mental analysis in a way that few academic disciplines do. I routinely tell my students that excavation is the most fun part of archaeology (Figure 1).
BUT, with all of that in mind, it is important to begin this chapter on archaeological excavation with three warnings:
- Excavation is only a very small part of what practicing archaeologists actually do – and some archaeologists never go near a trowel. Background research, surveying, mapping, lab work, and analysis are all equally important components of the archaeological process.
- When you excavate an archaeological site, you are destroying it. You can’t excavate the same ground twice – and this means that it is essential to carefully record everything that you do.
- There are important ethical concerns about who has (or should have) authority over sites, artifacts, and landscapes of the past. This includes the power to make decisions about whether archaeological sites should be excavated – and if so, when, and by whom.
We’ll reflect back on these warnings as we move through the chapter. For now, let’s begin with a quick review of what an archaeological site is and how archaeologists go about exploring it.
Sites and Site Formation Processes
While archaeological survey takes place over regions and landscapes (see Archaeological Surveys and Remote Sensing), excavation takes place at the level of the archaeological . But just what is a site? Although the term is widely used, its definition is deceptively complicated. Many in the general public assume an archaeological site must include some sort of ancient monumental architecture, but this is not the case. At its most basic, an archaeological site is a place where there is physical evidence of past human activity. A site may be formed because someone lost or threw away one or more objects as they went about their daily activities. Sites may also be created on purpose, through the burial of offerings, , or human remains. Finally, a site could be the result of the abandonment of a settlement, structure, or campsite.
Notably, an archaeological site does not always correspond to an area that would have been understood as meaningful to the people who used it. This is because archaeological sites depend on the deposition of material objects or physical changes to the landscape – and not all activities have a physical trace. For example, when I was growing up, I spent a lot of time in the woods behind my childhood home, building forts or playing hide-and-go-seek with my sister. Other than the odd lost toy, there is no material evidence of that portion of my childhood. However, some old metal tools that were abandoned (but never used) in those same woods are still present. The material evidence leaves a very unbalanced perspective on how this area was used during the 1980s. Think about your own daily lives; which activities leave a material trace, and which do not?
Robert Dunnell (1992) critiqued the concept of ‘site’ in archaeology as being essentially unhelpful to our understanding of the past, noting that sites are defined by the archaeologists who observe them rather than by the people who lived within them. He argued that the term ‘site’ is defective in part because it could lead the archaeologist to overlook how an individual feature fit into a larger archaeological landscape. Moreover, it’s important to note that an archaeological site may include more than one occupation period, and each occupation may have different boundaries. If I camp by the river and several years later someone builds a factory there, the remains of our two occupations may partially overlap, despite being part of two very different histories. Nevertheless, when an archaeologist records the area, it could be noted as only one site.
Despite these very valid critiques, the term ‘site’ is still standard in archaeological usage, and necessary in cultural resource management in order to be able to legally protect our archaeological heritage (see Cultural Resource Management and Archaeology). As we excavate, however, we should keep these considerations in mind as we consider how the site was formed. An understanding of should affect how we excavate and how we interpret what we find.
Site formation processes refer to the way that objects or features become part of the archaeological record through natural processes or as a result of human activity. After a settlement, structure, or campsite is abandoned, the materials left behind may be affected by plant activity, animal activity, human activity, or architectural collapse. For example, the city of Pripyat in Ukraine was abandoned after the Chernobyl nuclear power plant disaster in 1986, and drone footage from 2013-2016 shows how the town has changed over the years.
As we excavate, we need to be able to tell if the placement or preservation of different items is due to their original deposition or the result of post-occupation site formation processes. After watching the video of Pripyat, look around the place in which you are currently sitting. If that space were abandoned today, what materials would still be there in 30 years? 300? 3,000? 30,000? What materials would have decomposed? What might be in that space that is not there now? What materials would have been moved around and why? How might decomposition or movement of various items affect future archaeologists’ interpretation of the use of that space?
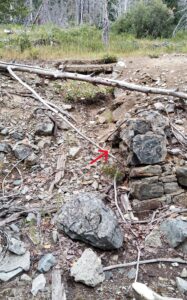
There are a number of different natural site formation processes that could affect archaeological interpretation. For example, artifacts, , and may be moved as a result of plant growth, especially as roots push through the soil or vines break through architecture. Rodents or other animals may burrow through a site, moving artifacts around, and these burrows may be mistaken for post-holes or other archaeological features. This and can be identified in many abandoned structures (Figure 2). Other natural site formation processes include cryoturbation (the mixing of soils and associated artifacts due to the freezing and thawing of groundwater), argilliturbation (which occurs in clay soils as they get wet and dry), and graviturbation (which occurs in hilly environments as soils, rocks, and associated artifacts roll downhill).
Cultural processes affect the ultimate presentation of archaeological sites as well. Artifacts from a site may be collected and parts of a site may be reused in a manner different from what was originally intended. Cultural disturbance, like building or farming on top of a previously occupied site, also affects the way the site may appear to archaeologists. By the time a site is recorded, it is often composed primarily of refuse or material that people considered to be no longer useful. For example, at a site I worked at in Bolivia, a local man shared that as a child one of his jobs had been to collect batanes (grinding stones) that could still be used, and that these would be sold at the market. As a result, archaeologists likely have a significant undercount of batanes that were actually used at the site. Likewise, across the United States, as family farms failed throughout the 20th century, many buildings initially built to house animals were reused for storage or trash, much of which may not be related to the original occupation. In contrast, some of these structures were revitalized and transformed into “rustic” wedding venues. Either form of reuse could confuse future archaeologists interested in the structure, which is why all site formation processes should be considered as we design our excavation strategies.
Excavation Strategy
An excavation begins by deciding where to dig. Archaeologists do not dig haphazardly! Whether we are working in (cultural resource management) or as part of an academic project, we first carefully identify which sites to excavate and where to excavate on a given site. An excavation needs to be planned according to several factors: the goal of the research, available funding, time in the field, and legal/ethical concerns.
Goals, Constraints, and Guidelines
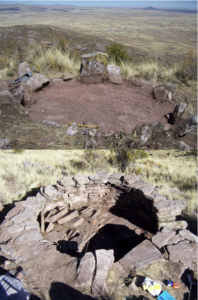
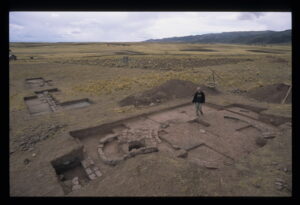
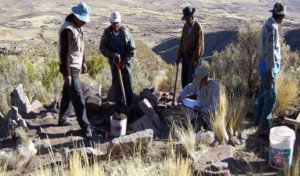
The first thing to consider is the goal of the research. Why are you excavating in the first place? In CRM in the United States, archaeological sites are most often identified in . Excavation may take place in Phase II or Phase III. A excavation is generally small in scale, designed to test the integrity and importance of the archaeological site to see if it is eligible for inclusion on the . A excavation is full data recovery, designed to learn as much as possible about the site. (See Cultural Resource Management and Archaeology.) In contrast, an academic project should be guided by a specific, focused research question. What do you hope to learn? An archaeologist who is interested in investigating subsistence strategies would take a very different approach to excavation than one who is researching burial practices, for example. At my own excavations at the site of Pukara de Khonkho in Bolivia, I was most interested in the everyday lives of people at the settlement. As a result, I focused my excavations around the circular domestic structures that were visible on the surface of the site (Figure 3).
Funding is often a limiting factor when it comes to planning an excavation strategy, and this can be true in both CRM and academic contexts. CRM companies will generally bid for projects, trying to balance the need to put forth a competitive bid with the need to earn money to pay the archaeologists and field technicians and also have sufficient funding to effectively follow an appropriate research design. There can sometimes be pressure to complete a project as quickly and cheaply as possible. At the same time, organizations that contract an archaeology firm may have trouble with their own budgetary resources. I once worked on a CRM project that stalled because the development company that had contracted the firm I was working for did not have the funds to continue.
In the academic world, projects are mostly funded through grants. Grants can come from the archaeologist’s own institution, from private granting organizations (e.g. Wenner Gren Foundation, Sigma Xi), from the federal government (e.g. National Science Foundation, Fulbright-Hays), from state or local governments or from non-governmental organizations. Another avenue for funding for an archaeologist working at a college or university is to develop a field school around her research agenda so that student tuition/fees can help fund the work. Because of the constant need for funding, archaeologists often spend considerable time working on grant applications or finding other ways to support their field seasons.
Another limiting factor for any archaeological excavation is time. CRM archaeologists need to complete the work within the scheduled time period and will often have developers urging them to be as fast as possible. Academic archaeologists usually work in the classroom through the fall, winter, and spring, so often end up only being able to do fieldwork in the summer months – or if it is possible to get time off of teaching through a sabbatical or other arrangement. When combined with the need to travel to a site – sometimes in a different country – and navigate paperwork and other bureaucracy before beginning any excavation, this often means that project directors must try to fit in a lot of work into a short time period. This may lead to long days of excavation with minimal time off during the field season. It also means that much of the rest of the year is spent in preparation for what may only be a couple months (or less) of excavation, survey, and other field research.
Last, but certainly not least, it is important to consider the legal and ethical perspective. As discussed in Cultural Resource Management and Archaeology, excavation in the United States is regulated under the (NHPA) and associated laws, which require coordination with State Historic Preservation Offices, Tribal Historic Preservation Offices, and other interested parties, including current landowners. You cannot just dig without the appropriate permits! Similar laws exist around the world, and if you are an archaeologist working in another country, it is your responsibility to adhere to any legal requirements surrounding excavation and the treatment/curation of any excavated objects. For example, when I took part in a research project in Bolivia, we needed to follow the protocols of the national government (through the Unidad Nacional de Arqueología) as well as make arrangements with the local community and individual landowners where the excavations would take place. This often required prolonged discussions and negotiations before we could even think about picking up a trowel. As discussed in Archaeological Ethics and World Heritage, such discussions are incredibly important, especially as it concerns , and no excavation should ever be conducted without genuine consultation.
Sampling Strategies

Once an archaeologist has considered her goals, funding, time, and legal/ethical considerations, it’s time to pick a sampling strategy. In almost any context, archaeologists will not be able to excavate an entire site – nor would they want to. Remember, excavation is destruction, so it is always good practice to preserve at least part of the site for future researchers. Archaeologists often begin by mapping a grid over the archaeological site. A basic grid helps us keep track of where different archaeological features are found, where excavation units are placed, and how everything relates spatially. Depending on the specific needs of the project, a sampling strategy for excavation may be random, stratified random, systematic, or judgmental (Figure 4.)
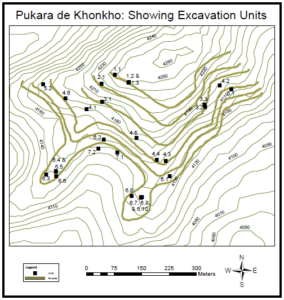
So what is the difference between these four sampling strategies? A is exactly that. An archaeologist would look at the site grid, number it, and use a random number generator (or similar approach) to select where to place the units. This may be useful if the archaeologist doesn’t know much about the site and is trying to get some basic information. A is when the archaeologist wants to ensure that she has proportional coverage of different parts of the site. For example, if a site had a clear ritual section and a domestic section, the archaeologist would select a proportional number of units in each area, but the placement of specific units within the area would be random. A would mean excavating a unit in a consistent pattern across the site. This would ensure full, even coverage of the area, but following the pattern strictly also means that the archaeologist could not prioritize areas of the site with a higher probability of producing useful information. Finally a simply means that the archaeologist would choose where she wants to dig. This is a good way to prioritize specific parts of the site – especially if there is limited time – but has the disadvantage of playing into the researcher’s bias and potentially ignoring the parts of the site that the researcher does not think are important. In the real world, most excavation strategies use a balance of each approach. For example, in my work on the site of Pukara de Khonkho, I made the judgmental decision to place the excavation units around previously mapped structures because I was interested in everyday life at the site. I chose a stratified random sample of those structures, making sure to select a proportional number of structures from different parts of the site. (Figure 5).
Depending on the site and the research question, the strategy may be more oriented towards vertical vs. horizontal excavations. In a , the archaeologists dig deep excavation units, sometimes in a “telephone booth” style. This is useful in highlighting the site’s ; archaeologists can clearly see the layers of the soil (and the different contexts of site occupation) in the unit walls. Such excavations may also be necessary if the archaeologists are interested in very early time periods that are under deep soil deposits or if they want to better understand the chronology of site occupation. However, because it takes a long time to dig a deep hole, they would excavate fewer excavation units overall, and would only ever uncover small snapshots of the occupation layers they are interested in (Figure 6).
In contrast, a is designed to bring an entire section or site down to a single occupation layer. This helps archaeologists to see how the different parts of the site were situated in relationship to each other at the time of occupation. This is a great strategy if researchers are following a wall or a building, and want to see it in its entirety. However, if the site was occupied at different times, it prioritizes one occupation over others. Archaeologists would have to dig through (and thus destroy) later occupations to uncover the one they are interested in, and may never get down to earlier occupations (Figure 7).
Excavation Methods
Obviously, there are pros and cons to any excavation strategy, but at a certain point, it’s time to get in the dirt and open the first unit! Through the last few pages, I’ve been referring the archaeological , but have not yet defined the term. This is simply the name that is given to the area that is dug for excavation. Archaeological units are usually square, but can be of different sizes depending on the landscape and research question. The default, however, tends to be 2×2 meters. We dig in these box shapes in order to maintain some control over the space of excavation and to help with mapping. The units are generally tied into the overall site grid and oriented to the cardinal directions (North/East/South/West). Archaeologists are very careful to dig nice, straight walls that clearly show a profile of the site’s stratigraphy. (Believe me; archaeologists can get very intense about their unit’s walls. If you ever walk too close to the edge of a unit and collapse a wall, you will see real anger!)
Tools of Excavation
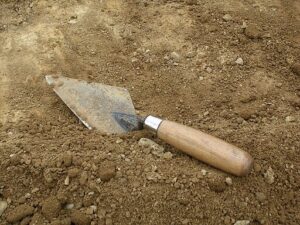
The trowel (Figure 8) is probably the most important tool in the archaeologist’s toolkit (quite literally), and is often symbolic of the discipline as a whole. The standard is a pointed masonry trowel, although a complete toolkit will also often include a “margin trowel” with a rectangular blade to help shape the corners of the excavation unit. Marshalltown trowels inspire fairly intense brand loyalty (at least among US archaeologists), as referenced in Flannery’s (1982) classic tongue-in-cheek ode to the field “The Golden Marshalltown.” Field archaeologists tend to have a strong attachment to their personal trowels, and will use the same one for many years. Archaeologists usually keep their trowels sharpened (using a metal file) so that they can more easily cut through small roots during excavation. It is truly a multi-faceted tool, and I’ve even known some archaeologists to practice competitive trowel-throwing events – on breaks, of course. (See The ArchaeoOlympic Games for more suggested events – not to be tried at home!)
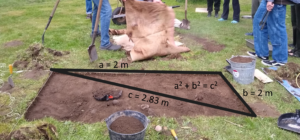
However, the trowel is far from the only tool used in excavation. Archaeologists need a compass to orient the unit. Measuring tapes are necessary to make sure the unit is plotted to the correct size. When plotting a 2×2 meter unit, for example, it is possible to ensure that the corners are in the right place by measuring out a 2.83 meter hypotenuse. And you thought you’d never need to use the Pythagorean theorem (Figure 9)! Nails are used to mark the corners of the unit, and they are wrapped with string, to show the boundaries of the unit wall. An extra length of string is tied to the nail that is chosen as the unit (often the highest corner). When a line level is hung from this string to ensure a consistent height, the archaeologist can then measure to the unit floor to keep track of the depth of excavation or to note the location of a specific artifact or feature. (Figure 10).
When it comes to digging, a project may start with a backhoe, a shovel, or a pickaxe to help cut through the thick topsoil and to quickly remove layers of soil that lie over the archaeological context. The choice of tool depends entirely on the type of project and the type of soil. In an environment where archaeologists expect the archaeological materials to appear at a deeper level (for example, when a site is known to lie under plowed farm fields), a backhoe may be used to more quickly remove the upper levels, although a monitor should usually still stand outside and watch to ensure that nothing unexpected is found. A pickaxe may be used if the soil is very compact. On most of the projects I’ve worked on, however, I’ve begun with a flat-edged shovel, sharpened so that it can easily cut through and remove the sod.
Once the archaeologists are through the thick topsoil and into the levels where they expect to find archaeological materials, they usually switch to hand tools. Trowels are used to scrape dirt into dustpans, which are then dumped into dig buckets. Clippers cut roots/branches that intrude into the excavation unit. Brushes are important to clean artifacts in situ. At times, smaller or more specialized tools can be used in specific contexts. For example, bamboo tools are often used for excavating around bone in order to avoid scratching it. You can see some of these tools in use at the Cooper’s Ferry Site in the short video “The Excavation Process: The Tools.”
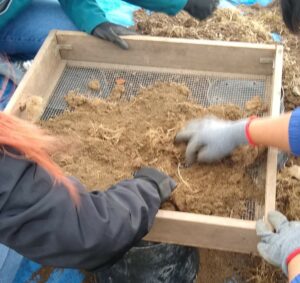
All dirt from the excavation is put through a screen in order to make sure no artifacts are overlooked. Screens can be different sizes and styles depending on the needs of the excavation. A small hand screen can be carried and used by an individual excavator. A larger rocking sifting screen has two legs that sit on the ground, with the archaeologist holding up the other end; to use this screen, a second archaeologist must be responsible for shoveling and loading the dirt into the screen. While these screens are relatively portable, in longer term excavations, archaeologists might set up larger table screens or hang a screen from a tripod (Figure 11). In the United States, the standard screen size is ¼ inch. This is usually wide enough that the dirt will fall through, but small enough to leave most artifacts/ecofacts behind. Sometimes the screen is of different sizes, depending on the needs of the excavation. For example, since fish bones are often small enough to fall through a standard ¼ inch screen, a sample of soil may be put through a 1/8 inch screen to see if anything is consistently being missed.
How to Dig
Excavation continues in controlled levels. Archaeologists do not dig into the dirt, creating uneven holes. Instead, the trowels are used in a slow scraping motion, taking down the whole unit evenly, a little bit at a time. Excavation pauses at points for notetaking, sketching maps, and to separate the artifacts/ecofacts found at different depths. When a specific feature is noted (like a pit, a hearth, or a posthole) the feature is excavated separately, in order to keep the items found in that context together and apart from the surrounding soil matrix. This may be useful later in analysis, when archaeologists are trying to date different components of site occupation. When possible, archaeologists will try to leave an artifact in place until its location can be directly mapped in. Archaeologists will measure not only where it is located on a XY axis within the unit itself, but will also measure its depth (as shown in Figure 10) to get a better idea of how it relates to other artifacts and to the site’s geology. At times, artifacts and features will be recorded using GPS coordinates, but these are not always accurate at the scale archaeologists need in all parts of the world.
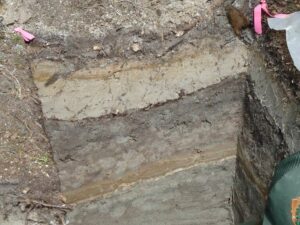
Sometimes excavation follows arbitrary (usually 10 cm) levels; other times, archaeologists will attempt to follow the natural levels of the soil. Both techniques provide a vertical control to let the excavators know where any artifacts are coming from. Artificial levels are useful when archaeologists do not know the geology of the area well or when there are not clear distinctions visible in the soil between different occupations or time periods. This avoids mixing of artifacts/ecofacts from different depths, and can be useful in later setting the chronology. When it is possible to clearly distinguish natural layers, however, following these levels can help to distinguish between different deposition events, leading to even better chronological control. As archaeologists dig, they always endeavor to keep the side walls of the unit straight and clean. This helps archaeologists to better identify the site’s stratigraphy, which will later be important in determining chronology (see Dating Methods in Archaeology). Can you see the shift from the thick grey ash towards the top of the profile to to the darker brown subsoil in the image at left? (Figure 12)
Finally, after the excavation is complete and all notes have been taken, the excavators carefully backfill the units. This helps protect the unexcavated portions of the site. Besides, no one wants a field full of holes! Now that you’ve had the general introduction, explore some examples of various field sites at the AIA’s “Interactive Digs” webpage – interactivedigs.com How do different projects approach excavation? (See “Additional Exercises” at the end of this chapter for a class activity linked to this webpage.)
Recording and Collection
Through it all, no matter where you are working, the most important thing to remember is to take careful notes, as you can see me doing at the site of Pukara de Khonkho (Bolivia) in the image at right (Figure 13). You never get a second chance to excavate an archaeological unit. Once you have removed the soil and the artifacts, it is impossible to put them back exactly the way you found them. In this sense, archaeological excavation differs from other sciences because it is never fully replicable. Through the process of excavation, an archaeologist is destroying the site. If careful notes are not taken at every stage, information is being destroyed — and there is no way to get it back.
How/What to Record
It is one thing to remember that note-taking is important. It is another to figure out exactly what you should record for any given excavation. Different archaeologists have vastly different note-taking styles. Some have a tendency to record literally everything – from the weather, to the way the dew sparkled on the flowers, to their mood that day, to what they had for lunch… If an archaeologist writes too much, especially if it is disorganized, it can be difficult for a later researcher to find the important data amongst her prose. In contrast, you can imagine it is even more frustrating to try to decipher field notes that are too sparse, where the information the researcher needs was never recorded in the first place.
For this reason, most archaeological excavations have standardized forms – or – that have spaces for the information that the excavators are expected to collect from each level or feature context. The specific items on each form vary from project to project depending on the research design and local idiosyncrasies. However, most include spaces to record the name of the site, the date of excavation, the number of the unit, the level and/or feature number, the depth and size of the context, the color and texture of the soil, the number and type of artifacts, ecofacts, and/or features that were discovered, preliminary interpretations, and any other notes and/or sketches. You can see examples of some context sheets (along with a lesson about how to use them to collect and analyze data) in the “Gabbing about Gabii” Data Story exercise, linked at the end of this chapter.
Part of taking good notes also includes collecting good images. Photographs are taken of the archaeological excavation at regular intervals, and some projects supplement with more technological imagery including multispectral imaging or aerial photos from UAVs (unmanned aerial vehicles). However, not all imaging requires technology; many archaeological projects also include an archaeological illustrator. Illustrators are skilled at recording the sorts of details that do not show up well in photos, and can also be commissioned to draw site or artifact reconstructions (Figure 14). Even for archaeologists without an artistic talent, however, it is important to be able to draw basic sketches. These include plot maps of the floors of the different levels of the unit as well as of the . These drawings should plot the location of relevant features as well as artifacts and ecofacts that were found in situ. Remember, when it comes to analysis, it is absolutely essential to know where an artifact comes from in order to be able to interpret what it means. In fact, I would argue that the most important thing about any excavated artifact is its , the way it relates to other artifacts, features, or local geology.
How/What to Collect
When the notes are complete, it’s time to consider what else you will be taking away from the archaeological site. In most cases, excavators will collect lithics (stone artifacts), ceramics, metals, bone tools, other animal bone, human bone and any other objects identified in the field that were made and/or used by humans. These items will be collected in paper or cloth bags, which are carefully labelled by context so that it will be clear what items were found where when they get into the lab. In addition, burnt wood or other carbon samples are often collected in order to be tested for radiocarbon dating (see Dating Methods in Archaeology). Carbon samples should be carefully wrapped in aluminum foil; avoid touching with your hands to reduce the possibility of contamination. In addition, soil samples are often collected from relevant contexts for or other specialized analyses.
Criteria for what should be collected and what should be left behind differ based on the project design and the local archaeological standards. In some cases, it can be hard to tell what is meaningful and what is not when you are in the field. I have been on many projects when objects that looked like lithic in the field turned out to be simple, unmodified rocks once they were cleaned up and analyzed in the lab! In this case, it is generally better to err on the side of caution. An unmodified rock can be thrown out in the lab, but you’ll never get another chance to collect an artifact if you leave it in the field. Archaeologists must also consider where the artifacts will be stored once they are cleaned and analyzed. Good is important so that collections can be restudied in the future, but there is a shortage of high-quality facilities available.
In some cases, though, objects cannot – or should not – be collected. Some are too big to be moved from their locations, or they may be part of features (like a part of a structure) that will lose their integrity if removed from the site; preservation may be better in situ than if an item was removed to a lab or repository. In other cases, items should not be removed in accordance with the will of the local or descendant community. There may be spiritual or political reasons that particular items must stay in the location where they were originally found. This is often the case with mortuary or religious contexts. In making these decisions, and indeed through the entire excavation, it is essential to be following clear standards of archaeological ethics.
Ethical Considerations
As discussed in the chapter on Archaeological Ethics and World Heritage, there are various standards of archaeological ethics that govern professional archaeological activities around the world. In the United States, the best known is the Code of Ethics of the Society for American Archaeology, which highlights nine principles: stewardship; accountability; commercialization; public education and outreach; intellectual property; public reporting and publication; records and preservation; training and resources; and safe educational and workplace environments. In this chapter, I draw on this and other ethical codes in considering archaeologists’ responsibilities as we excavate – responsibilities to those with whom we work, to the archaeological record, to descendant communities, and to students and others interested in learning about the past.
Perhaps the first priority is to make sure that the field site is a safe environment for all who work there. This means making sure the excavation is physically safe: don’t dig units that are dangerously deep, and be aware of the potential for dangerous falls or accidents with sharpened trowels or other tools. Every field site should have a first aid kit, and directors should be aware of the nearest health facility – keeping in mind that field research may be far from well-populated areas. Conducting physical labor in a variety of different environments increases the risk for heatstroke, frostbite, allergies, and other environmental hazards. In certain contexts archaeologists should also be prepared for animal attacks, including snake and insect bites. Bacteria and parasites can also be threats, as can hazardous waste, buried chemicals, or even unexploded ordinances that can be encountered during excavation (Poirier & Feder 2001).
In addition, excavation sites should be free from sexual harassment or discrimination. Unfortunately, this has not always been the case. In fact, a recent survey of field-based sciences (including archaeology) found that a majority of female scientists have experienced sexual harassment and discrimination in the field, and sexual assault is also common (Clancy et al. 2014; Meyers et al. 2018). Racial discrimination is also a problem, especially as archaeology – particularly field archaeology – remains a predominately white discipline. See “Why the Whiteness of Archaeology is a Problem” for some specific examples and directions for growth. Until our field sites can be safe for all practitioners, it is difficult to make progress towards stewardship, collaboration, education, or any of our other goals.
Stewardship is the goal to preserve and protect the archaeological record – keeping it out of the hands of looters and other commercial interests. This means excavating judiciously. Since excavation is destruction, archeologists should only dig when we would learn more from the process than we would gain from preserving the site in situ – or when such preservation is impossible due to outside forces like development or climate events. When possible, at least part of the site should be left unexcavated for future archaeologists who may have the advantage of new technologies for analysis and different research questions to investigate. If a site may be threatened by looters, it is essential to not share its exact coordinates publicly unless it is well protected and/or there is a meaningful reason for doing so (e.g. a public outreach campaign). Archaeologists must also care for the objects that are excavated, making sure that they are appropriately curated and stored. In order to discourage commercialization, archaeologists should avoid providing estimates of price for items found on their sites. And it goes without saying that archaeologists should never engage in commercial activity around artifacts that they have personally collected through excavation.

Accountability (to descendant communities and other stakeholders) is key, especially when it comes to human remains or religious sites. Archaeologists do not have an inherent right to excavate anywhere they please; we must coordinate and collaborate with descendent community members and current land-owners in addition to following any state or national-level legislation. While it is a science of the past, all science is conducted for the benefit of living peoples, and the needs of those most closely affiliated with the cultural resources should be prioritized. This means respecting that some sites should never be excavated, and that certain protocols may be necessary in other contexts. For example, in the Aymara community in Bolivia where I have conducted research, it is necessary to prepare a waxt’a (an offering) for the Pachamama (the Aymara ‘Earth Mother’) before any sort of excavation begins. This offering is performed by a yatiri (an Aymara ritual specialist) in accordance with local tradition (Figure 15). This is similar to what is done when the earth is broken for agriculture or construction. The land (and features on the landscape) are living beings in this context – part of the community within which the archaeologists work. (See also the Descendant Communities chapter for discussion on successful collaborative archaeological projects.)
As archaeologists excavate, it’s important to remember our responsibility to share what we have learned, first with descendent communities and other stakeholders, but also with the broader public. We have already discussed the importance of good field notes. However, there is little value in even the most comprehensive field notes if they are simply stored in a researcher’s file cabinet or on her hard drive. For this reason, it is considered an ethical responsibility for archaeologists to publish what they’ve learned. Academic archaeologists generally are most rewarded for publishing in peer-reviewed research journals, but it is also important to share information with the general public – through popular magazines, blogs, TV documentaries, webpages, public outreach events, and/or OER (online educational resources) like this textbook. This also helps to combat pseudoarchaeology, by educating the public and debunking ideas that discriminate against native populations. (See the chapter on Public Outreach and Archaeology for more information and ideas for outreach as well as the chapter titled Understanding Ancient Mysteries for more on the dangers of pseudoarchaeology.)
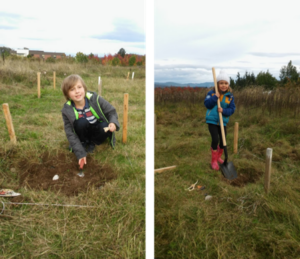
Finally, archaeologists’ obligation to educate also extends to training new archaeologists in the process of excavation. Since a site can never be excavated twice, good training in excavation is incredibly important. Students should have a safe place to learn without worrying that they might destroy irreplaceable cultural materials. In my introductory Archaeology classes, for example, I often bury a fake ‘site’ on campus (sometimes with the assistance of my children) so that students can practice setting up a unit, excavating, and mapping artifacts in situ (Figure 16). See Additional Exercises (below) for more suggestions about how to set up practice excavations. Despite the benefits of these sorts of exercises, however, the experience of actually taking part in an archaeological excavation is invaluable, so if you are considering going on in anthropology or archaeology (or even if you just think it sounds like fun!) I would highly recommend attending an archaeological . ‘Field schools’ are generally taught over the summer, and provide an opportunity to learn archaeology through hands-on practice, while also earning college credit.
Conclusion
I began this chapter with three warnings about excavation: there is much more to archaeology than digging; excavation is destruction; and it is essential to consider ethics. After reading this chapter, I hope you can see the importance of each of these caveats. Archaeology is not just about excavation – and in many contexts excavation may even be harmful. That said, when done carefully and ethically – in collaboration and consultation with descendant communities and while taking copious notes – it is an invaluable tool in archaeology’s efforts to learn about the past. And it can also be a lot of fun! I hope you enjoy your time in the field.
Discussion Questions
- What are the three warnings the author highlights about excavation? Why do you think these are important?
- What are some different site formation processes, and how might they affect excavation and interpretation?
- What is the process of excavation, and what considerations must an archaeologist evaluate before embarking on an excavation project?
- What are some of the ethical concerns of excavation and collection, and how should an archaeologist evaluate them?
- Interactive Digs Exercise: Explore ONE site highlighted on the “Interactive Digs” webpage – interactivedigs.com. Choose whatever site is most interesting to you. Take your time to explore some of the notes, videos, field reports, etc.Be able to briefly summarize what you learned about the site, and compare and contras what you learned with students who explored different sites. You should consider:
- A short description of excavation techniques (e.g. What parts of the site were excavated? How were those decisions made? What tools were used for excavation?)
- A description of any steps being taken to preserve this site and its cultural heritage (e.g. storage/conservation of artifacts, recording/reconstruction of architecture, publication of discoveries/interpretations, etc.)
- A reflection on the role tourism may or may not play at this site (e.g. Is this already a tourist destination? Does it have the potential to draw tourists? What benefits may tourism have to the site? What dangers might tourism pose?)
- Digital Data Stories: Explore the Alexandria Archive Institute’s Digital Data Story “Gabbing about Gabii: Going from Notes to Data to Narrative.” This will give you the experience of working with notes from an excavation to see how archaeologists are able to collect data from excavation and use this data to tell stories about the past.
- Practice Excavation: There are a variety of ways to prepare a “site” for students to practice excavation. Be creative depending on your location and resources:
- You may bury ‘artifacts’ in a spot on campus that students can later excavate. You may want to collect different colors/textures of soil to include in the fake site, and you can also begin to build your own artifact collection with materials from thrift stores (e.g. ceramics that you can break) or by roughly knapping your own stone tools. If it is possible to have a dedicated area so that the soil has time to settle before excavation begins, that is best. One sustainable approach is to have students bury the next term’s ‘site’ after they excavate theirs. Students can write a ‘story’ that the site they create is supposed to represent, and you can see how close the interpretation of the next term’s class is.
- Another sustainable possibility is to pair with another class that regularly does hands-on activities that leave a material trace on the landscape. For example, another class at our college holds a pit roast each Spring. Archaeology students are able to excavate the remains of a previous pit roast to see the feature left behind by that activity.
About the Author
 Jennifer Zovar is Associate Professor of Anthropology at Whatcom Community College in Bellingham, WA. Her academic research has focused in the Bolivian Andes, where she investigated an archaeological site that was occupied just before the Inca came into the region (and after the collapse of the earlier Tiwanaku polity.) Despite regularly telling her students that the ceramic analysis chapter of her dissertation was the most boring thing she’s ever written, she is continually inspired by the way that archaeological analysis of the smallest details can lead us to a more complete understanding of the lives of human beings in the past. In addition to her experience in Bolivia, she has also worked on archaeological projects in Guatemala and across the United States. When she is not researching or teaching anthropology, she loves camping and exploring with her kids and a loyal dog named Hank.
Further Exploration
The ArchaeOlympic Games – https://archaeology.co.uk/articles/news/the-archaeolympic-games.htm
Ethics in Professional Archaeology, Society for American Archaeology – https://www.saa.org/career-practice/ethics-in-professional-archaeology
The Excavation Process: The Tools, a video from Oregon State University’s excavation of the Cooper’s Ferry Site – https://www.youtube.com/watch?v=x9pGbpIPU-Y
Interactive Digs, Archaeological Institute of America – https://www.interactivedigs.com/
Why the Whiteness of Archaeology is a Problem, by William White and Catherine Draycott – https://www.sapiens.org/archaeology/archaeology-diversity/
References
Clancy, K., Nelson, R., Rutherford, J., and Hinde, K. (2014). Survey of Academic Field Experiences (SAFE): Trainees Report Harassment and Assault. PLoS ONE 9(7): e102172. https://doi.org/10.1371/journal.pone.0102172
Dunnell, R. C. (1992). The Notion Site. In Space, Time, and Archaeological Landscapes, edited by J. Rossignol & L. Wandsnider, pp. 21-31. Interdisciplinary Contributions to Archaeology, Springer. https://doi.org/10.1007/978-1-4899-2450-6_2
Flannery, K. (1982). The Golden Marshalltown: A Parable for Archaeology of the 1980’s. American Anthropologist 84(2): 265-278.
Meyers, M. S., Horton, E. T., Boudreaux, E. A., Carmody, S. B., Wright, A. P. & Dekle, V. J. (2018). The context and consequences of sexual harassment in Southeastern archaeology. Advances in Archaeological Practice 6(4):275-287.
Poirier, D. A. & Feder, K. L., eds. (2001). Dangerous Places: Health, Safety, and Archaeology. Bergin & Garvey.
Zovar, J. M. (2012). Post-Collapse Constructions of Community, Memory, and Identity: An Archaeological Analysis of Late Intermediate Period Community Formation in Bolivia’s Desaguadero Valley. [Doctoral dissertation, Vanderbilt University]. Vanderbilt University Institutional Repository. https://etd.library.vanderbilt.edu/etd-08012012-131813
A place where there is physical or material evidence of past human activity.
An intentionally buried collection of items.
Natural and cultural factors through which an archaeological site is created following the deposition of cultural material.
Inclusive term used to represent faunal and floral material obtained from the biotic environment and used by prehistoric and historic peoples.
An indication of human activity in the past that cannot be removed from the site. This might be the remains of a building or a discolored stain in the soil that represents an old trash pit.
A site formation process describing the movement of artifacts, ecofacts, or features as a result of plant activity.
A site formation process describing the movement of artifacts, ecofacts, or features as a result of animal activity.
The process by which historically significant landscapes, structures, buildings, sites, and artifacts are identified, assessed, and cared for to ensure their perpetuation for scientific research and personal edification, reflection, and enjoyment.
The first step in CRM archaeology, consists of a survey to identify whether a property is an archaeological site. It is designed to determine if there are any cultural materials in the impacted area.
The second step in CRM archaeology, designed to evaluate whether or not a recorded site is eligible for inclusion on the National Register.
The US federal government's official list of sites, buildings, structures, landscapes, or objects that are considered worthy of preservation because of their historic value.
The third step in CRM archaeology, consisting of data recovery following an approved research design. This type of data recovery is conducted when an eligible site cannot be preserved.
The landmark federal law protecting US cultural heritage, which governs how cultural resource management is practiced today.
Living people who are descended from the group(s) who occupied an archaeological site.
Left in the place where it was found.
A sampling strategy through which a certain number of specimens is randomly selected.
A sampling strategy through which a certain number of specimens is randomly selected from a variety of predetermined categories.
A sampling strategy through which a regular pattern is followed.
A sampling strategy based entirely on the judgment of the researcher.
A style of excavation that prioritizes depth, allowing archaeologists to view stratigraphic layers and observe the chronology of the site occupation.
Layers of soil and associated artifacts, which help to determine a site's chronology.
A style of excavation in which a large area is brought down to a single occupation area, allowing a bird's eye view of the site.
In archaeology the (usually) square space that is excavated, slowly and in layers.
A fixed point used to measure from when mapping.
In excavation, a 'context' is a specific layer or feature that is excavated as a unit. The 'context sheet' records the information gathered from a specific context.
The sides of the excavation unit.
The place of origin or source of an artifact or material.
The process of using water to separate soil into its components that are heavier and lighter than water.
The waste produced when making a chipped-stone tool.
the practice of cataloging, preserving, storing, and caring for archaeological collections and data.
A class (usually taught over the summer) where students learn about archaeology through doing it.
